
Get Started with Writingmate
Use this guide to sign in, send your first message, choose an AI model, and find the main tools in Writingmate.
1. Sign in
Open Writingmate and select Start 3-day free trial or the sign-in option. You can continue with Google or enter your email and use the verification code sent to your inbox.
After sign-in, Writingmate opens a new chat. Select New Chat whenever you want to start another conversation.
2. Find the composer and sidebar
The composer is the box labeled Send a message.... It contains the controls you will use most often:
- + opens file and tool options.
- The chat mode control switches between Chat Mode, Compare Mode, and Agent Mode.
- The model selector shows the active AI model and opens the model catalog.
- The microphone records a spoken prompt and converts it to text.
- The arrow sends your message.
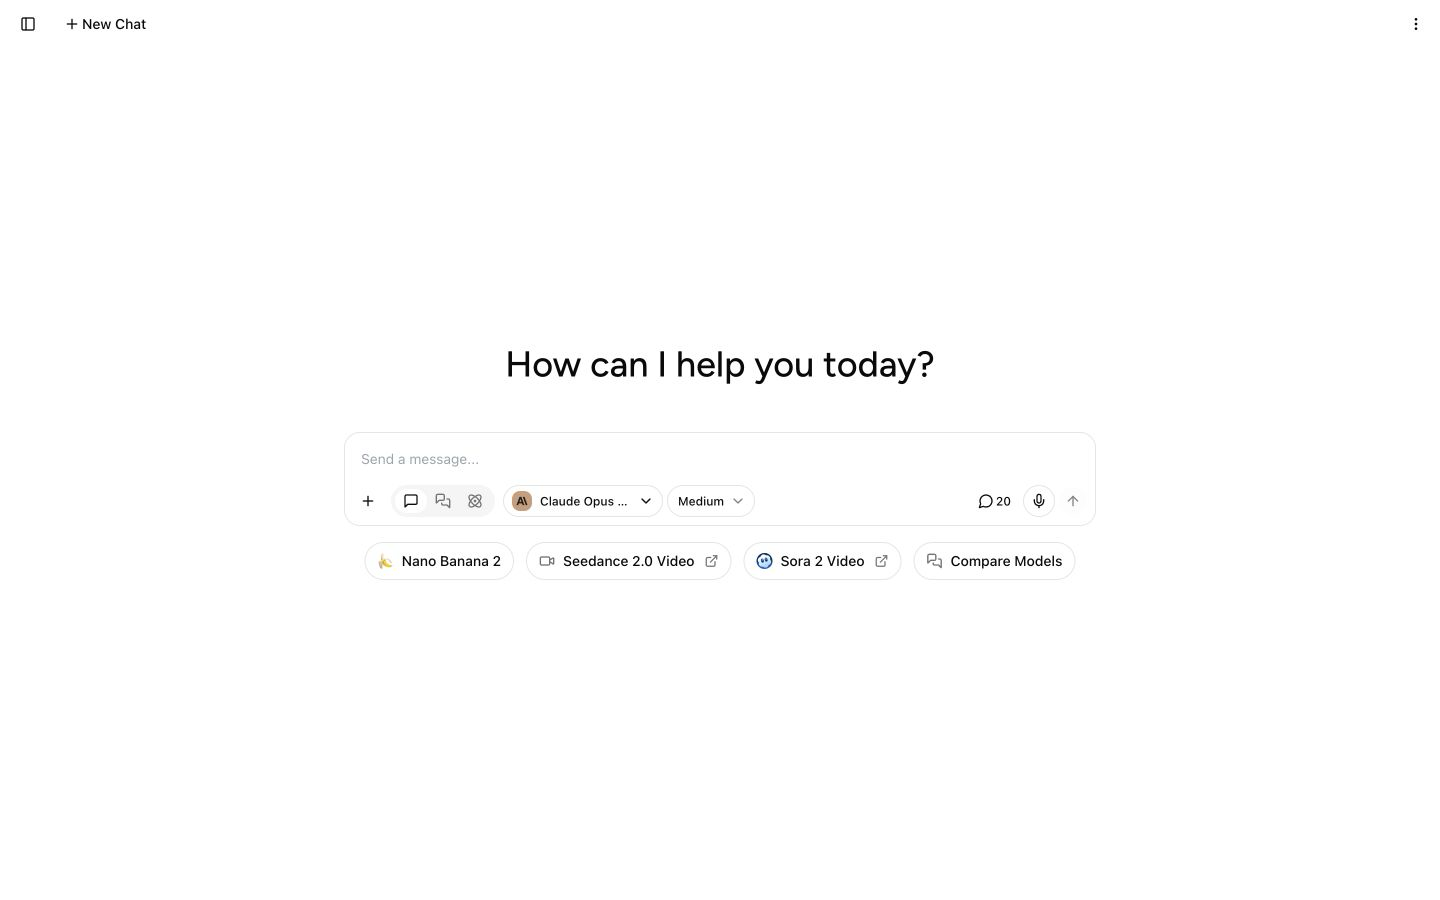
The new chat composer. Featured shortcuts below it may change as Writingmate adds models and tools.
Expand the sidebar with the button in the top-left corner. The sidebar contains New Chat, Search, Prompts, Agents, Images, Video, Projects when enabled for your workspace, and your chat history. Your profile menu is at the bottom.
3. Send your first message
- Keep Chat Mode selected for a normal single-model conversation.
- Open the model selector and choose a model from the Text tab.
- Type a clear request in Send a message....
- Select the send arrow or press
Enter.
For example:
Summarize the benefits and risks of using AI for customer support. Use a short table and list three questions I should answer before choosing a tool.
You can change models during a chat. Model availability and message limits depend on your plan. Select Manage Models at the bottom of the model selector to choose which text models appear in your list. See Supported AI Models and Message Limits.
4. Add a file or current web information
Select + in the composer to open Add content or tools.
- Choose Upload from computer to attach a supported document, spreadsheet, text file, or image.
- Choose Add from knowledge base to reuse a saved file when your plan includes this feature.
- Choose Web search when your question needs current online information and the selected model supports tools.
After adding a file, ask a specific question such as “Summarize the main findings” or “Compare the totals in these two sections.” See Uploading and Managing Files, Using Files, and Web Search.
5. Choose the right chat mode
- Chat Mode sends your prompt to one text model. Use it for everyday writing, questions, code, and analysis.
- Compare Mode sends the same prompt to two to four text models and shows their answers side by side. Use it when you want different approaches or a second opinion.
- Agent Mode handles multi-step research, analysis, and planning. It may use more messages than a normal chat.
To compare models, select Compare Mode, open the model selector, choose two to four models, and send one prompt.
6. Use Images and Video
Open Images in the sidebar, or use the Images tab in the model selector, to create an image from a prompt. Available options depend on the selected image model and can include reference images or image editing.
Open Video in the sidebar, or use the Video tab in the model selector, to create a short video from text or animate an uploaded image. Models support different durations, aspect ratios, resolutions, and audio options.
See AI Image Generation, AI Video Generation, and Compare Subscription Plans.
7. Save repeat work
Use the sidebar to keep useful work organized:
- Prompts saves instructions you use often. Type
/in the composer to insert a saved prompt. - Agents contains pre-built AI assistants and lets you create a custom Agent with saved instructions, a selected model, optional knowledge files, and optional tools.
- Projects group related chats when Projects are enabled for your workspace.
- Search finds previous chats and saved content.
- Chat history lets you reopen, pin, rename, share, or delete a conversation.
A saved Agent is different from Agent Mode. A saved Agent keeps instructions and knowledge for a repeated workflow. Agent Mode changes how Writingmate works through a complex task. See Overview of Agents, Creating Custom Agents, and Sidebar Navigation.
Next step
Start with one real task and keep the setup simple: use Chat Mode, choose a text model, and send a clear prompt. Add files, Web search, comparison, or an Agent only when the task needs them.